[Actualizado a 30 de septiembre de 2026]
Workflow de análisis
Reglas de seguridad del laboratorio
- NUNCA conectes la VM de análisis a Internet real.
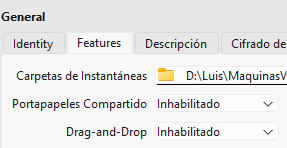
- NUNCA compartas el portapapeles entre host y VM de análisis.
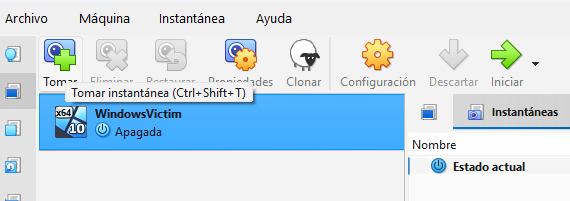
- SIEMPRE toma snapshot antes de ejecutar una muestra.
- NUNCA transfieras archivos del lab al host sin verificar.
- ACTUALIZA el host diariamente (las VMs son el sandbox, no el host).
- Al finalizar, SIEMPRE restaura al estado limpio entre análisis.
Detalle
1. NUNCA conectes la VM de análisis a Internet real
Dos opciones:
- Desconexión total
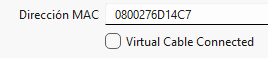
- Red interna
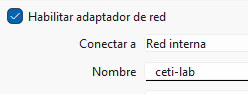
2. NUNCA compartas portapapeles
3. SIEMPRE toma snapshot antes
4. NUNCA transfieras archivos entre el host y la mv
En Windows
- Iniciar la mv
- Restaurar snapshot "FlareVM limpio"
- Iniciar REMnux + INetSim
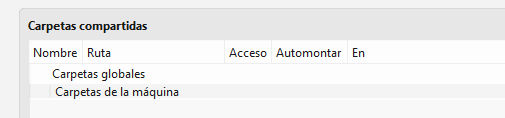
- Transferir muestra a FlareVM (carpeta compartida temporal)
- Desconectar carpeta compartida
- Análisis estático (sin ejecutar la muestra)
- Tomar snapshot pre-ejecución
- Ejecutar muestra con monitoring activo
- Capturar tráfico en REMnux
- Documentar hallazgos
- Restaurar snapshot limpio
Preparación equipo
Seguir enlace usando VAGRANT.
En AWS
AMI (Windows Flare-VM)
Seguir el manual AWS Malware Lab (Flare-VM + Apache Guacamole + Terraform) partiendo de Windows Server 2022 ya que 2025 falla.
Desactivar Windows Defender
To disable Microsoft Defender Antivirus on Windows Server 2025 via Group Policy, you must first disable Tamper Protection. Otherwise, modern Windows versions will ignore Group Policy changes made to Defender.
-
Open Group Policy Management: 1 min. Press
Win + R, typegpmc.mscfor Domain Group Policy (orgpedit.mscfor Local Group Policy), and press Enter. -
Navigate to Microsoft Defender Policy: 1 min. Navigate through the path tree:
Computer Configuration→Administrative Templates→Windows Components→Microsoft Defender Antivirus. -
Enable 'Turn off Microsoft Defender Antivirus': 2 min. Double-click Turn off Microsoft Defender Antivirus, select Enabled, and click OK.
(Note: Setting this policy to "Enabled" turns the feature OFF).
-
Disable Real-Time Protection (Recommended): 2 min. Navigate to the sub-folder Real-time Protection. Double-click Turn off real-time protection, select Enabled, and click OK.
-
Apply Policy Update: 1 min. Open PowerShell or Command Prompt as Administrator and run
gpupdate /forceto apply the policy immediately.
To verify if the policy applied successfully, run Get-MpComputerStatus | Select-Object RealTimeProtectionEnabled in PowerShell. The result should show False.
Alternative for Windows Server
If you are installing a third-party antivirus, Windows Server supports completely removing the Defender feature. You can run the following PowerShell command as Administrator and reboot:
Uninstall-WindowsFeature -Name Windows-Defender
Crear shadow copies
En Windows Server, el concepto de "Punto de restauración" (System Restore) que existe en Windows 10/11 no viene integrado. En su lugar, el sistema utiliza Instantáneas de volumen (Shadow Copies / VSS) o las Copias de seguridad de Windows Server (Windows Server Backup).
Opción 1: Crear una Instantánea de Volumen (VSS) por GUI
Para crear una instantánea rápida de un volumen (por ejemplo, C:):
-
Abrir Administración de discos: Presiona
Win + R, escribediskmgmt.mscy pulsa Enter. -
Acceder a Instantáneas: Haz clic derecho sobre el volumen (por ejemplo,
C:) y selecciona Configurar Instantáneas... (Configure Shadow Copies). -
Habilitar y Crear Instantánea: Selecciona el volumen deseado en la lista, pulsa en Habilitar (si no está activo) y haz clic en el botón Crear ahora.
Para comprobar que se creó correctamente, revisa en la lista de "Instantáneas de este volumen" que aparezca la fecha y hora actual.
Opción 2: Crear la Instantánea desde PowerShell (Más rápido)
Puedes ejecutar el siguiente comando en PowerShell como Administrador para generar la instantánea directamente:
(Get-WmiObject -List Win32_ShadowCopy).Create("C:\", "ClientAccessible")
Para verificar que la instantánea existe, ejecuta:
vssadmin list shadows
El resultado mostrará un listado con el ID y la fecha de la instantánea generada.
Opción 3: Estado del Sistema (System State Backup)
Si lo que buscas es respaldar los archivos críticos del sistema, el Active Directory (si aplica) y el registro antes de hacer cambios profundos:
- Instala la característica ejecutando en PowerShell:
Install-WindowsFeature -Name Windows-Server-Backup -IncludeManagementTools
- Crea una copia del estado del sistema guardándola en otro volumen (por ejemplo,
D:):
wbadmin start systemstatebackup -backupTarget:D: -quiet
REMnux + Flare-VM
- Automatizado con Terraform ➡️ AWS Malware Lab (REMnux + FLARE-VM)